Windows’ System Restore doesn’t get as much praise as it once did, even though it’s still an incredibly useful feature. Judging by the feedback on our own forums, it saves people from certain destruction on a nearly daily basis. The only problem is that it takes far too many steps to manually create a new restore point. Can’t we just make a shortcut icon for it? Turns out, yes, there are a couple of ways to do it.
 How to Use System Restore in Windows 7, 8, and 10
 Create a Restore Point for Windows 7 or Vista’s System Restore
Windows 7 Users: Create a VBScript Shortcut Icon that Creates a Restore Point with a Description
The easiest way to make a shortcut icon for creating a Restore Point in Windows 7 is to point that shortcut at a little custom vbscript. Unfortunately, changes to the way System Restore is called in Windows 8 and 10 prevent this script from working in those versions.
You can create the script yourself. First, copy the following text:
If WScript.Arguments.Count = 0 Then Set objShell = CreateObject("Shell.Application") objShell.ShellExecute "wscript.exe", WScript.ScriptFullName & " Run", , "runas", 1 Else GetObject("winmgmts:\\.\root\default:Systemrestore").CreateRestorePoint "description", 0, 100 End If Next, open Notepad. Paste the script you copied into a blank Notepad document and then save the script with whatever name you want. Just make sure to use the file extension .vbs rather than Notepad’s default .txt, so that Windows will know you’re not saving a plain text file, but a VBScript file. You can use VBScript to do some pretty cool things, in case you’re interested in learning more.
If you don’t feel like creating your own script file, you can also download one we’ve created for you. The download actually contains two different scripts. The “CreateRestorePoint.vbs” script will prompt you to type in a description for the restore point, like the script above–which is very helpful when restoring. However, there’s also a “CreateRestorePointSilent.vbs” script that will simply create the restore point without the prompt.
CreateRestorePoint Script
Whether you create the file yourself or download it, all you have to do is double-click it and say Yes when Windows asks you if it can make changes to your PC. In the script window, just type a description of why you’re creating the restore point and click OK. Windows will create the restore point without prompting you further.

If you want to verify that the restore point is created, you can open up System Restore by searching the Start menu for “create a restore point.” On the System Properties window that opens, click “System Restore” and step through the wizard to see the available restore points. Just be aware that it sometimes takes a few minutes after running the script for the restore point to be created and show up as an available choice.

Once you verify the script file works, you’ll likely want to save it somewhere and create a shortcut to it that you can customize. Just right-click-and-drag the file to where you want the shortcut, and choose “Create Shortcut Here” when prompted. You can then change any properties you like for the shortcut, including assigning a keyboard shortcut for launching it.
Windows 7, 8, and 10 Users: Create a Regular Shortcut Icon that Immediately Creates a Restore Point
If you use Windows 8 or 10—or if you use Windows 7 and prefer not to use a VBscript—you can also create a regular shortcut that creates a script by using System Restore’s command line parameters. The only real downside of doing it this way is that you can’t add a description for your restore point.
If you’re using Windows 7, this shortcut will work just like you expect, creating a new restore point every time you use it.
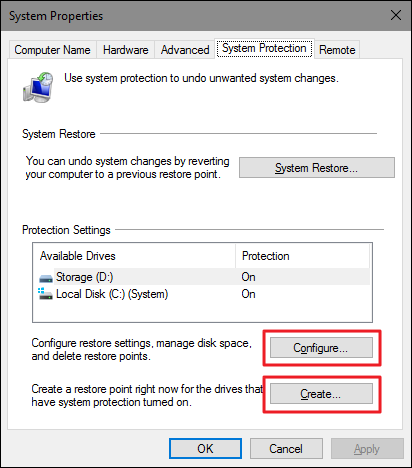
If you’re using Windows 8 or 10, changes to System Restore mean the shortcut comes with a caveat. In Windows 8 and 10, System Restore will not create a new restore point using the command in this shortcut if an automatic restore point has been created within the previous 24 hours. If a restore point less than 24 hours old exists for any of your hard drives, you’ll need to delete those restore points before you can create a new one. You can do that by opening up the System Protection tab of the System Properties dialog, clicking the “Configure” button, and then clicking the “Delete” button on the window that pops up.

Of course, if you’re already opening up that “System Restore” tab, the button for creating a new manual restore point is right there, so you might as well just use that instead. If there is not a restore point less than 24 hours old, the shortcut will work just fine. So, you could always use it before making settings changes and at least have the knowledge that you’ll have a restore point no more than a day old.
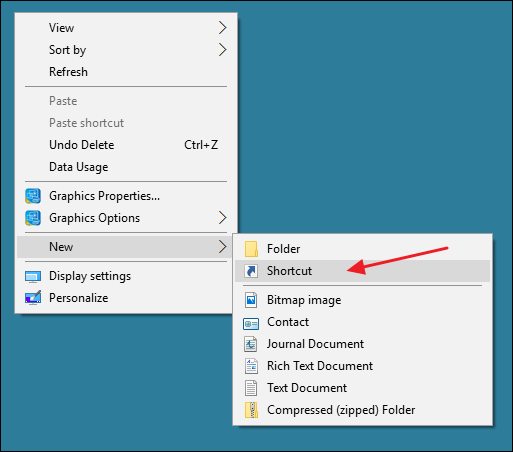
To create the shortcut, right-click anywhere you want to place it and on the context menu, choose New > Shortcut.

On the Create Shortcut window, copy and paste the following command in the “Type a name for this shortcut” box and then click Next.
cmd.exe /k "wmic.exe /Namespace:\\root\default Path SystemRestore Call CreateRestorePoint "My Shortcut Restore Point", 100, 7"

The command you’re pasting launches the Windows Management Instrumentation Command (WMIC) tool and tells it to create a restore point. On the next screen, type a name for your new shortcut and then click Finish.

The new shortcut will feature the Command Prompt icon. Right-click it and choose Properties.

In the properties window, on the Shortcut tab, click “Advanced.”

In the Advanced Properties window, select the “Run as administrator” option and then click OK. This will save you from having to run the shortcut as an administrator yourself each time you use it.

Change anything else you want about the shortcut–like assigning a shortcut key or a different icon–and then click OK to close the shortcut’s properties window. Now, you can just double-click your new shortcut any time you want to create a restore point.
While both these techniques for creating a shortcut take a little setup time, having that shortcut around is useful, and can save you time and headache in the future. Instead of searching for the System Restore tool and wading through several screens and a half-dozen clicks, you can create restore points immediately. And since you probably should be creating them more often that you already do, why not make it easy?